|
|
The information presented in this topic refers to the self service Learn Single Sign-On (SSO) feature. If you have a custom SSO built by the Oracle Learn Cloud Services team, and you are looking for assistance, please refer to any documentation they have provided. |
|
|
In order to use the Learn SSO feature with your LearnCenter, you must have your entire LearnCenter secured with SSL. To confirm if your LearnCenter is secured, look to see if "https://" is in the beginning of your LearnCenter URL. If you do not see "https://" in your LearnCenter URL, you must open a Service Request (SR) asking for your entire LearnCenter to be secured with SSL before you can use this feature. Contact Customer Support through My Oracle Support to open an SR. |
|
|
Additional information about configuring SSO for your LearnCenter can be found in the My Oracle Support Knowledge Base. |
The Integrations Connections page is used to set up Learn Single Sign-On (SSO). Single Sign-On is functionality that allows Users to sign on in one website or system and automatically be signed on in another website or system. For example, a User could sign on to your internal intranet site and then click a link to access the LearnCenter without having to sign in to LearnCenter as well.
You can set up SSO at either the root or the sub LearnCenter level. You can set up an SSO connection for the root and define a scope of LearnCenters that includes the root and all Sub-LearnCenters. You could also set up a connection that includes a sub LearnCenter and all of its child sub LearnCenters. The choice is yours, and you can set up an unlimited number of connections.
Learn offers two options to customers who want a single sign-on (SSO) for their LearnCenter:
|
|
While this feature has been designed so that you can implement it yourself, if you decide you need more help after reading these detailed instructions, we are offering 10 hours of technical consulting for a nominal charge. Contact your Oracle Learn Cloud Account Manager for details. |
|
|
VERY IMPORTANT! If you have an SSO set up by our Services team, do not make changes to the Learn SSO pages without first contacting Support. Making changes to these pages while you have an active SSO setup can create problems with access to your LearnCenters. If you currently have a custom SSO that meets your needs, you may keep it for as long as you wish to do so. If you want to migrate from your custom SSO to the Learn product SSO, please open a Service Request (SR) through My Oracle Support to make that request. (Note that if you do NOT have a current custom SSO, no Service Request is necessary in order for you to set up the Learn product SSO.) |
See Learn SSO Terminology to read more about the terms and concepts for this feature.
Before you can set up SSO connections, you will need to gather some information from your Information Technology (IT) Department or personnel. Review the topic called SSO Information for Your IT Department with IT before proceeding.
Once you have received the necessary information from your IT Department, follow these (high level) steps to set up Learn SSO.
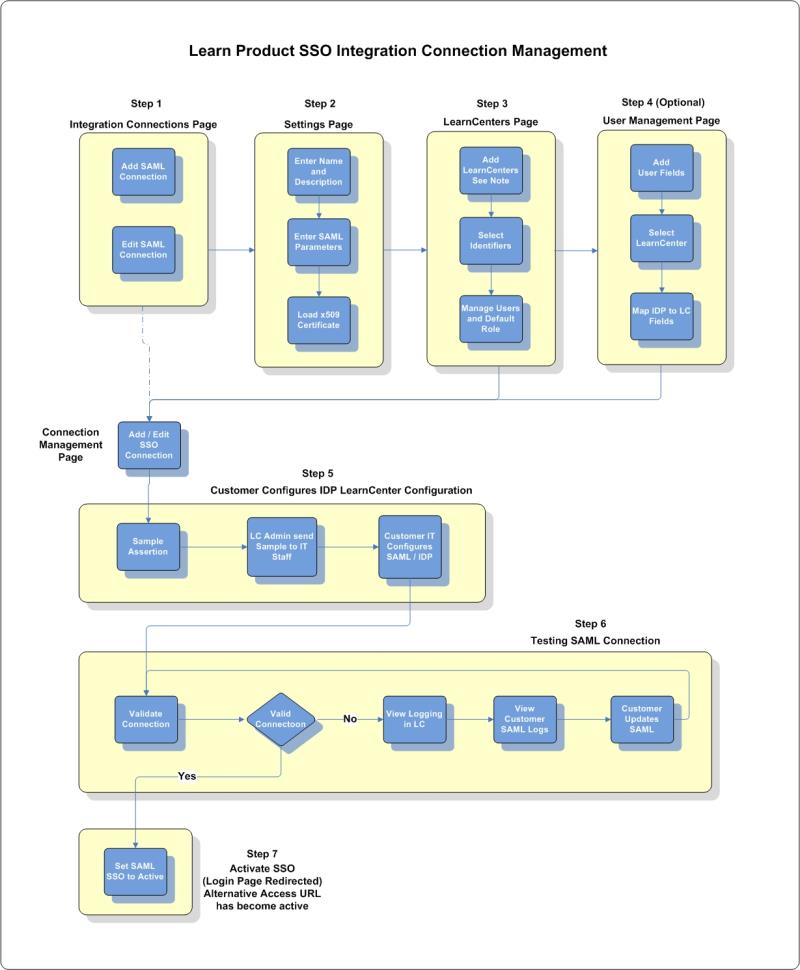
The following work flow diagram provides more detail for the steps required for setting up SSO for your LearnCenter. Step-by-step instructions can be found in the topic called Adding a New SSO Connection


Copyright © 2010-2015, Oracle and/or its affiliates. All rights reserved.